Among the most popular and widely used browser, Google Chrome has managed to stay on top of the charts for quite some time now. Being a simple browser with hardly any plugins and add-ons, this has what made Chrome stand out from among its competitors. Although it does have to survive tough competitions from Mozilla and UC Browser, it manages to outshine them. The latter two have also played some role in pushing Chrome to the pinnacle. Whereas the plugins in Mozilla is raising security concerns, UC Browser is filled with tons of ads. So, ultimately the users revert to their ‘default’ Chrome browser. From outside, it looks like a minimalistic browser. But what normal users don’t know that it has tons of features hidden beneath itself. These features could be found under the ‘Flags’ section. To access the ‘flags’ page and enable the desired flags, head over to the below section. Do note that, although these features are experimental, it won’t cause any harm, either to Google Chrome or to your device as a whole. But still, if you find Chrome to behave absurdly after enabling a certain flag, then disable that flag right away. Before beginning with the tweaks for your Google Chrome browser, please have a look at the below section regarding the steps needed to access the ‘flags’ in the said browser.
How to Access the ‘Flags’ Page in Google Chrome
Before enabling these tweaks on your Google Chrome browser, you need to access the Flags section. Follow the below steps for the same.
Open Google Chrome and head over to the address bar.Type the following address: chrome://flagsThat’s it! You will now be taken to the ‘flag’ section. Search for the desired flag in the ‘Search flags’ box or browse through all the available ones.After enabling the flag, a little notification will pop-up, asking you to restart your browser. Tap on “Relaunch Now”. This is compulsory, otherwise, the changes won’t take place. Don’t worry, all your tabs will be there as usual.
15 Cool Google Chrome Tips for Android
Here is a list of 15 amazing tips, tricks, and tweaks for your Google Chrome for Android. Go try them all!
1. Dark Mode for Chrome
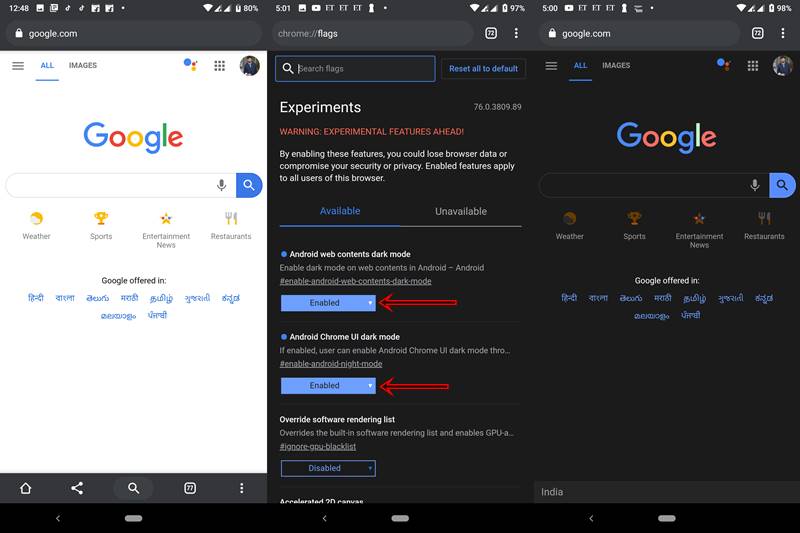
Dark Mode has for long been among the most requested feature by all the Android users. Now, Google has finally decided to implement it natively in its latest (yet to launch) Android OS. Also, many Google apps seem to have taken the same route as well. These include the Photos, Files Go, Youtube, Calendar, Calculator, Messages, etc. But one app that is (or rather was) left behind is the Chrome browser. What many users are unaware of is the fact that this could well be implemented in Chrome as well. Just a little tweak needs to be done.
In the ‘flags’ search box, enter “Android Chrome UI dark mode”. Also, search for “Android web content dark mode”.Tap on the button which says ‘Default’.Change it to Enable. Do this for both the flags.Relaunch your browser.
2. New UI of Download Section
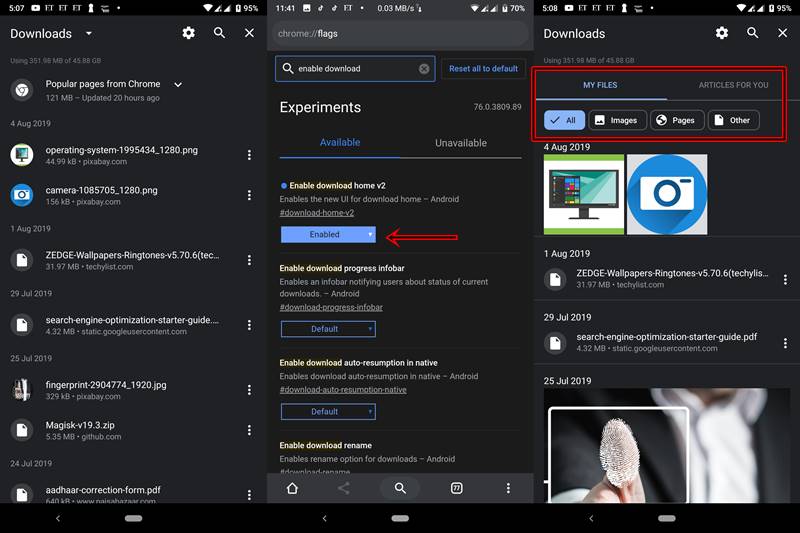
Many of you might agree that finding the downloaded files in Chrome is a pretty daunting task. With hardly any categorization, it takes ages finding a file. Well, not anymore. As a result of this amazing tweak, you could completely change the UI of the Downloads section. Not only it looks more pleasing to the eyes aesthetically, but the complete revamp also makes much more sense now. There would be categories for different file types like audio, images, Other, etc., allowing you to easily search for the required file.
Navigate to the flag search box and enter “download-home-v2”.Enable it and relaunch your browser.
3. [Works on Some Devices] Long Press Back Button for History
Well, this is a real time-saver. Rather than going to the ‘Settings’ > ‘History’ tab and searching for the required content, you could simply long-press the back button. Doing this will present you with a list of recently visited sites. All this could be performed without leaving your current web page. The only downside? It doesn’t seem to work on all devices. But there is no harm in giving it a try, isn’t it? Search for the “long-press-back-for-history”. If it is there, enable it and relaunch your browser. But if you get the message- “no matching experiments”, leave it and simply move on to the next tip below!
4. Enable Parallel Downloading
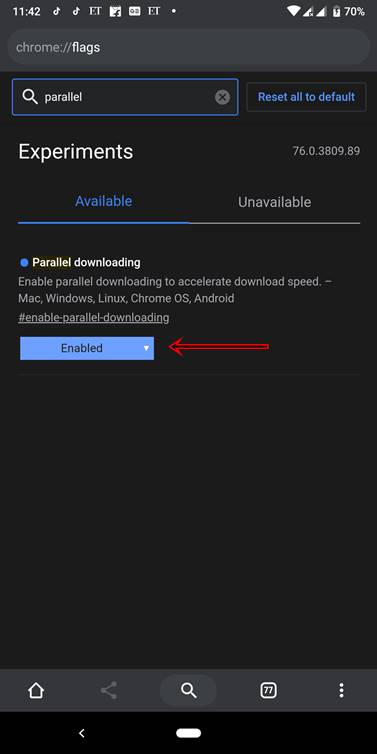
Do you know why downloaders like Internet Download Manager or Torrent Clients can download files so quickly? This is because they break down a heavy file into several smaller files and then compile them all together later on. And now, you could do the same with Google Chrome as well.
Navigate to the flag’s search box and type in “Parallel downloading”.Enable the said feature and relaunch your browser.
5. Change the Layout of Tab Switcher
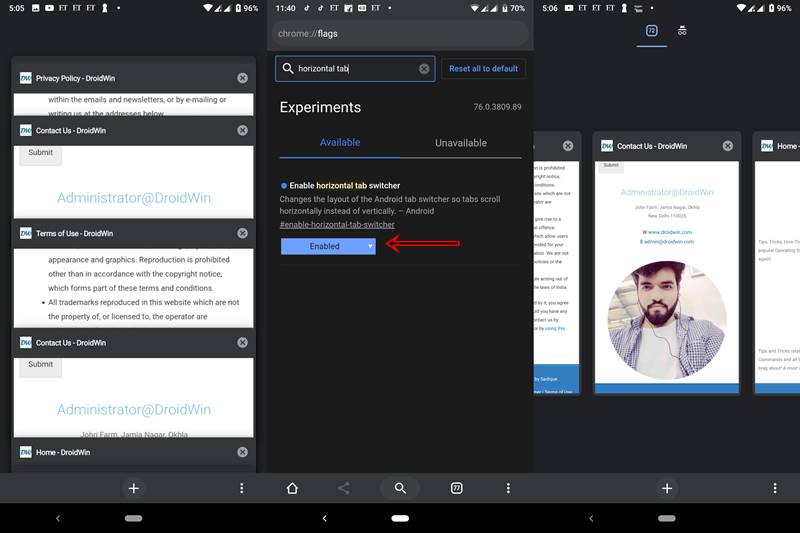
Let’s admit it. The layout of Tab Switcher in Google Chrome is quite confusing, to say the least. Everything seems so much complicated and cramped for space. All the cards are stacked one over another in such a way that except for the front one, you could hardly guess the contents of the other.
But as you might be aware by now, we do have an experimental option for this as well. This will change the layout from the current ‘Vertically stacked’ to the ‘Horizontal’ one. And once you change it, you wouldn’t ever want to go back the previous one, ever. The horizontal view seems to be much clearer, precise and better looking. To enable it:
Search for the “enable-horizontal-tab-switcher” flag.Enable it and relaunch the Chrome browser.
6. Change the Look and Feel of Context Menu
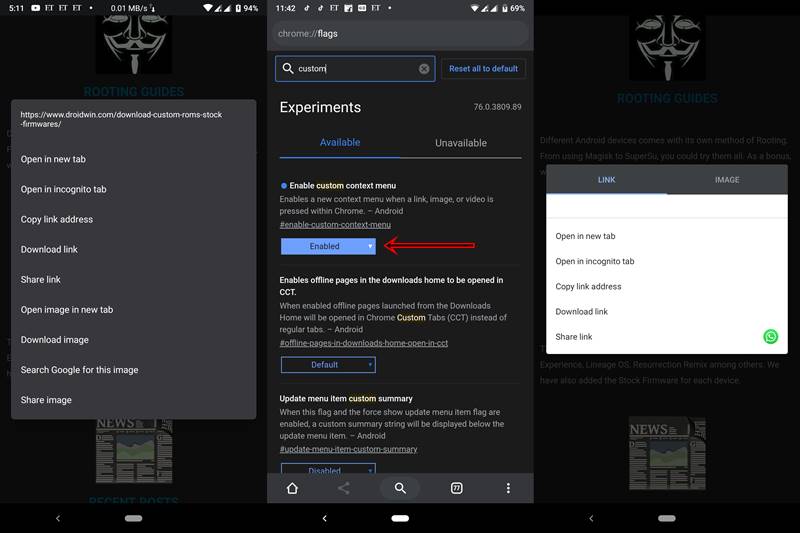
When you long-press on an image or an icon you could see several options. These include ‘Open in a new tab’, ‘Copy link address’, ‘Open in Incognito’, etc. But after a certain period, you might as well get bored with its dull UI and lack of options. Well, we have a trick up our sleeves for that as well. By enabling a certain flag, the UI would be changed and new animation and some extra features would get added as well. For all that to happen, just change the “enable-custom-context-menu” flag from Default to Enable. Then relaunch your browser.
7. Make Scrolling Smoother
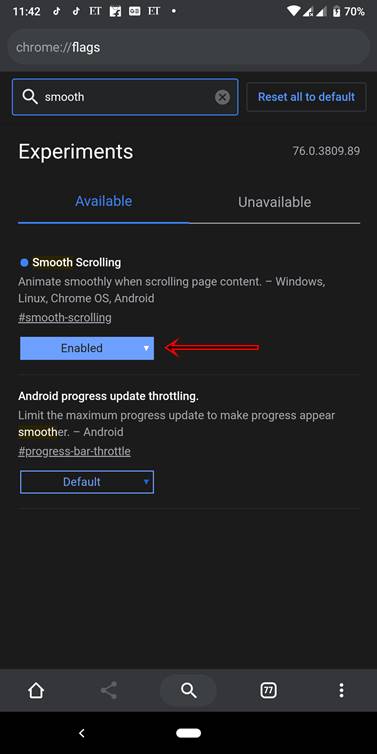
Using a mid-range device and browsing heavy websites, well then you are in for a nightmare of an experience. This is because these websites are heavy resource consumers which your device wouldn’t be able to provide. As a result, even the basic operation of scrolling through that site seems a pretty big challenge. This is where this tweak comes in handy. By enabling the “Smooth Scrolling” flag (and then relaunching your browser), you could seamlessly browse through such heavy websites without any roadblocks.
8. Navigation Bar at the Bottom
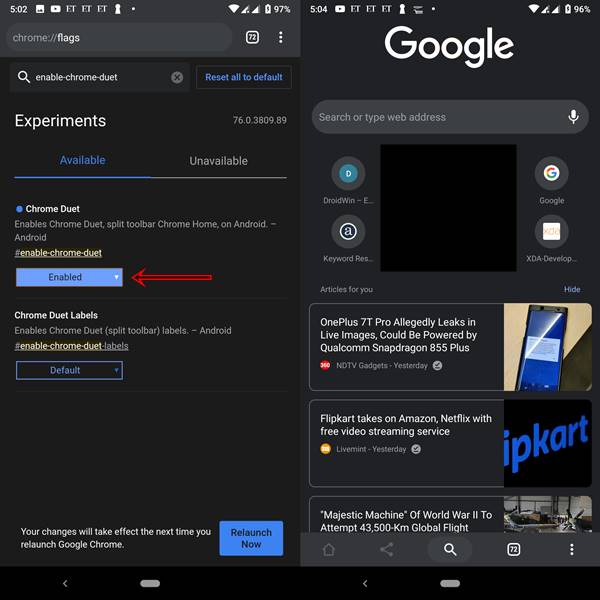
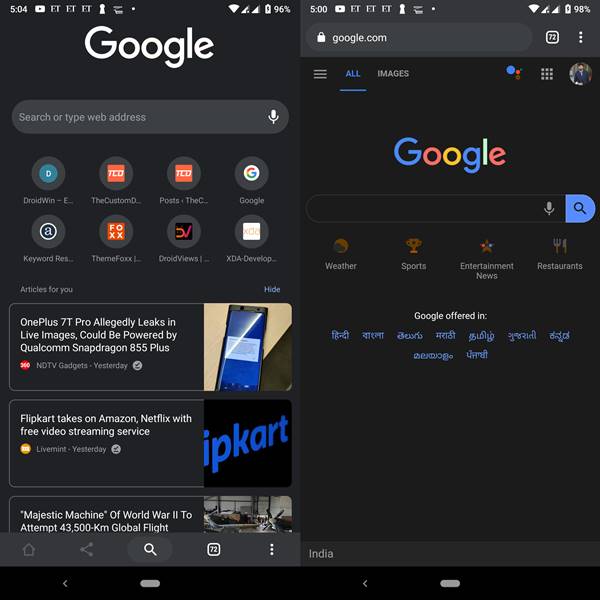
“With larger displays, comes greater responsibility”. Well, that is what seems to be the case right now. Having a huge display seems to be the norm these days, with hardly anyone talking below 6″ screens. Although it provides a completely different experience while watching videos, yet it has its fair share of downsides as well. The most important among them is the lack of ability to use your device single-handedly. That is why many devices have started providing the navigation menu at the bottom- easily reachable by anyone, no matter the screen size. And now you could perform the same action on Google. Just follow these points:
Head over to the ‘flags’ search box.Search for “enable-chrome-duet”.Change it to Enable from Default and relaunch the browser.
9. Hide recommended articles
Next on the list of 15 Amazing Tweaks for Google Chrome comes the option to hide recommended articles. When you open Google Chrome, you will be greeted with clustered news and articles from different sources. Well if you rather prefer to keep your homepage clean, then removing these ‘distractions’ would seem to be the best bet. Search for the “enable-ntp-remote-suggestions” flag and change its status from Default to Enable. Then relaunch your browser. Your browser will be given a fresh new look. Side Note: Till now all the above tweaks required you to access the ‘flags’. But the below tweaks for Google Chrome doesn’t need so.
10. In-Content Search
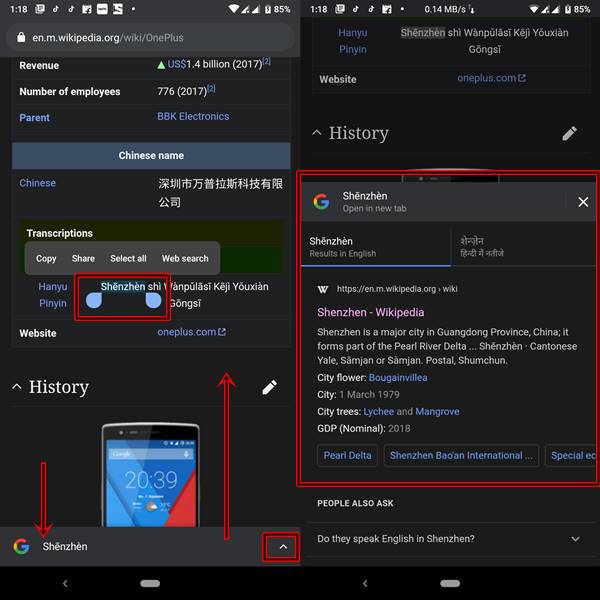
This amazing tip is a time saver at its best. Suppose you are browsing about the OnePlus OEM and ends up at the word ‘Shenzhen’. Living on the complete opposite side of the world, chances are you probably wouldn’t have heard about this place. Then the only option you had was to select the text, open a new tab and paste it there. Then chose the best result and start reading. Phew! Isn’t that too much of an effort just for looking for a word? Well, Google seems to have covered that as well.
And no, there is no tweak involved this time. You don’t have to enable any flags whatsoever. Just select the word you need to search for. Then tap on the bottom bar that appears with the selected word of your screen. That’s it! Wasn’t that easy?
11. Save Web-Pages as PDF
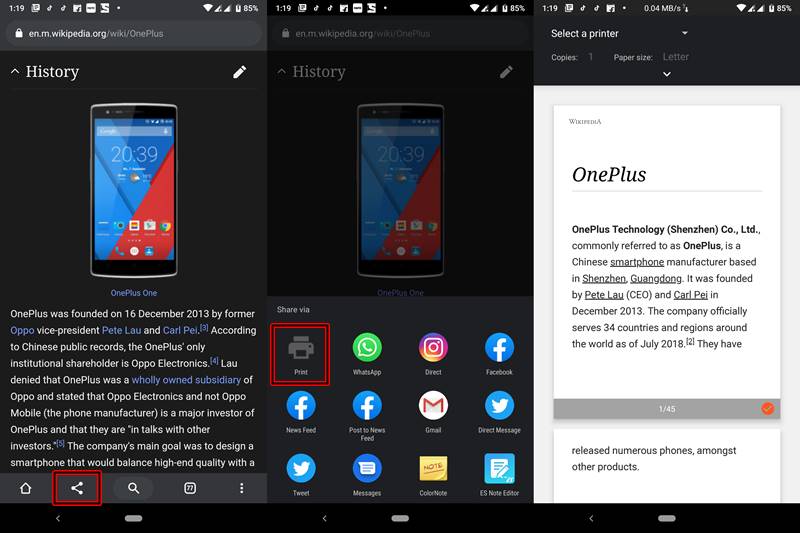
Google Chrome has the option to save pages that could be read later on when there is no internet connectivity. Well that everyone knows by now. But once you delete the browser’s cache or data, it will be gone. So, how to permanently save it on your device? Or suppose you want to send it to someone in a more professional manner- rather than just sharing him the link. What should be the necessary action that needs to be taken?
The answer is pretty straight-forward. Just save it as a PDF. And contrary to popular belief, you don’t need any PDF convertor or Reader for the said process to be carried out. Your device is capable enough to carry out the said process. Just head over to the page you want to download and select the ‘Share’ button/icon. Next tap on the ‘Printer’ icon. That’s it. The selected page would be saved in the PDF format.
12. Force Zoom on Any Website
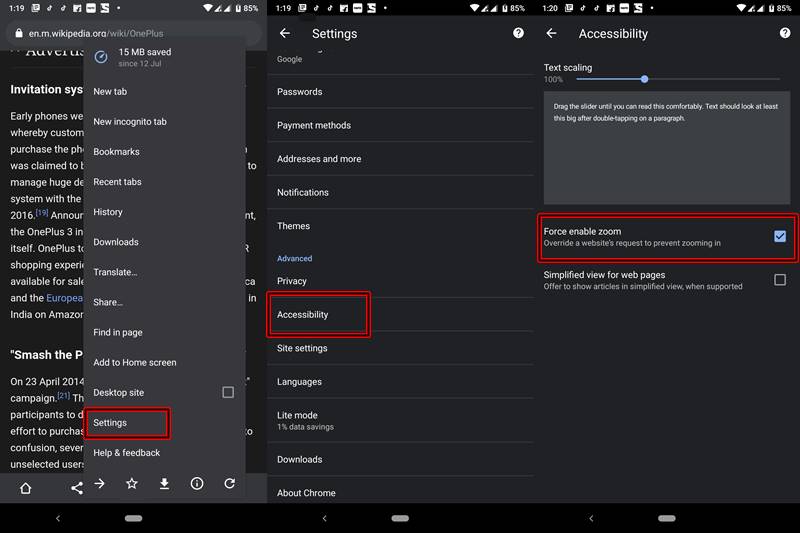
On some web pages, you need to pinch in/ zoom in to correctly get an idea of the contents of the web page. But strangely, you couldn’t perform the same action on all websites. This is because some sites block the ability to zoom in to their websites- for the reason best known to them. But there is a workaround for that as well. Again, you don’t need any flags whatsoever. Under Chrome, go to “Settings” > “Accessibility” > Tick the checkbox next to the “Force enable zoom”. Now you could zoom even on the pages where the zoom functionality is blocked by the website.
13. Manage Notifications
Let’s admit it. Notifications are probably the best and worst thing to happen to a mobile device. It depends on what context we are talking about. While getting notified about important events and messages are probably a boon, well the same can’t be said about others. Many a time you may get bombarded from various websites sending you unnecessary notifications, regarding the topics you don’t even care about.
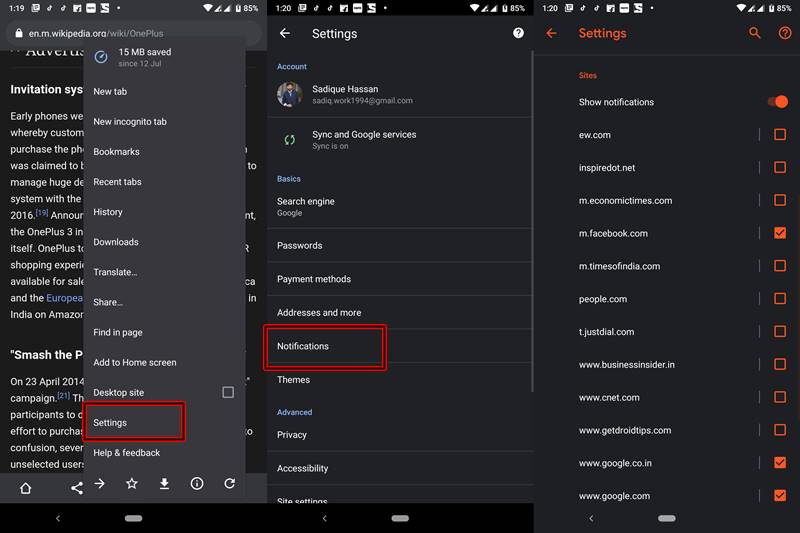
if you too get annoyed by these not-called-for notifications, then probably its time to shut them down. There are two ways to approach it. Either you could turn down the notifications for all the websites or only the selected ones. What is even better is the fact that you could also turn off the notifications sent by the browser, regarding downloading of files, controlling media playback, etc. So just head over to the Chrome’s “Settings” menu and tap on “Notifications”. Under that, untick the checkbox for which you no longer want the notifications.
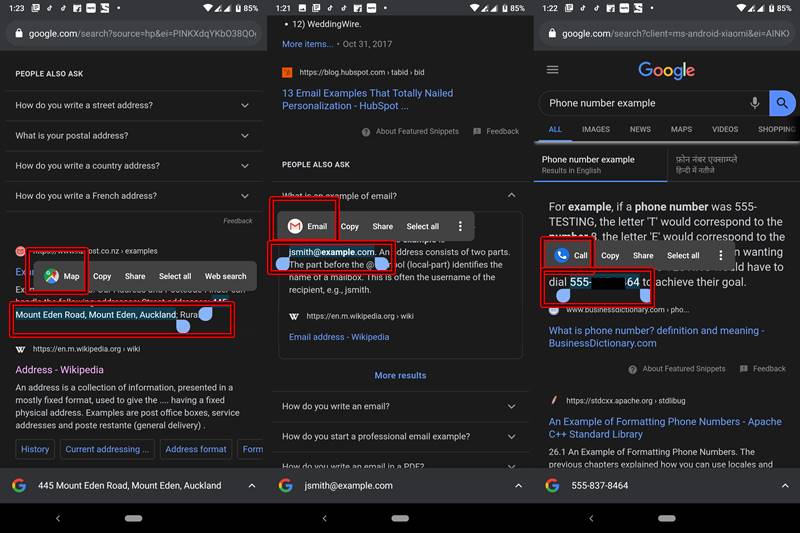
14. Shortcut to Access Phone Numbers, E-Mails and Address
Got a phone number from a website and want to call it? Or read an address over a webpage and want to look up for its route. Browsed to a company’s ‘About Us’ page and got their e-mail address on which you want to send an mail. Well in all such cases, earlier you had to copy them from their destination and then paste them at the desired source.
But now the scenario has changed and the process has become way easier. Just select (by dragging the cursor) the desired phone number, e-mail address or the location. Google will then automatically suggest you open the Dialer, Gmail or Maps. Just tap the desired option and you are good to go.
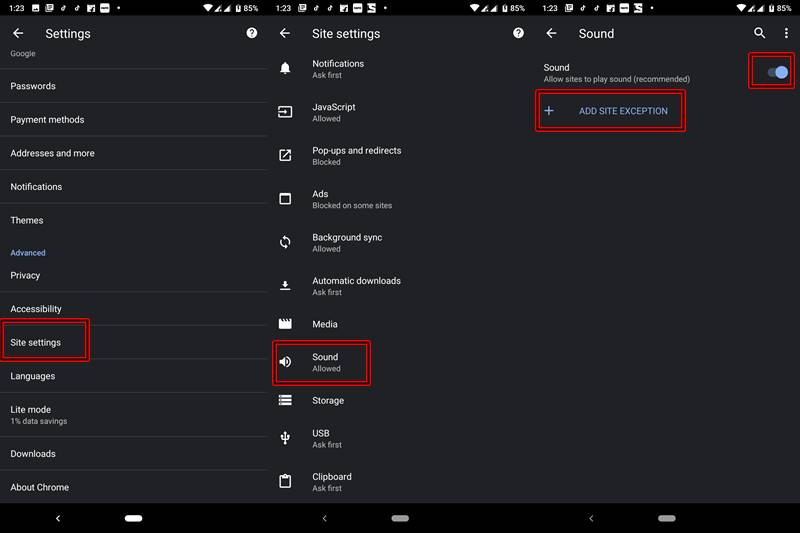
15. Mute a Website (or all Websites) from Playing Sound by Default
Let’s face it. You are browsing a website in the middle of the night and suddenly audio (of a video, podcast, etc) starts to play. Well, this is the most dreadful and annoying situation that no one wants to be in. But unfortunately, everyone seems to be a part of at some stage. That was, until now. With the help of the below-mentioned feature, you could turn off the sound for a single web page or all the sites altogether.
Navigate to “Settings” > “Site Settings” > “Sounds”. Turn off the sound for all the websites by enabling the toggle situated at the top. Or add the sites to the whitelist from the “ADD SITE EXCEPTION”. In that case, all the sites mentioned in there would continue to play audio. So add accordingly. So that was a detailed guide on 15 Amazing Tweaks for Google Chrome. Do share your experience regarding them. Which one did you like the most? Was there any non-functional as well? Also, if you know of any cool tweaks for this browser, mention them in the comments section below. I will try to add them to this guide. Happy Tweaking! Want more such articles? Request for your preferred topic via the Request Page.
About Chief Editor

