Out of the box you get OnePlus’ own customized skin dubbed as OxygenOS10, based on Android 10. The quad rear camera setup (48+8+5+2) manages to take some pretty decent clicks and the dual front camera (32+8) also does complete justice to this device. To support all these, you get a 4115 mAh battery that will be sufficient to make the device last an entire day, if not the 30W fast charging will come in handy. All these are quite commendable considering that the base variant costs only around Rs 25000, but these are just the beginning. Once you jump into the custom development scenes, you will have literally opened the floodgates to the plentitude of customizations. In this regard, you could unlock the bootloader on your Nord device, root it via TWRP Recovery, or without TWRP- using Magisk and patched boot image file. Apart from this, you could also replace the device’s stock recovery via TWRP Recovery and carry out its functionality. And in this guide, we will be focusing on just that. So without further ado, here are the steps to install TWRP Recovery on OnePlus Nord. OTHER ONEPLUS NORD ARTICLES
Root OnePlus Nord using TWRP RecoveryHow to Root OnePlus Nord without TWRP (using Patched Boot file)How to Unlock the Bootloader on OnePlus Nord
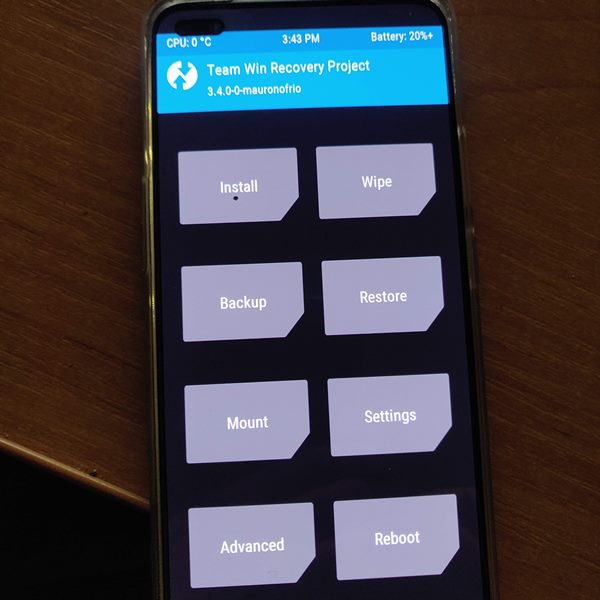
Some Noteworthy Features of TWRP Recovery for OnePlus Nord
The benefits associated with a custom recovery is no hidden secret. The ability to flash Custom ROMs, flashable ZIPs, mods (including Magisk Modules), frameworks, image files among others is just the tip of the iceberg. Likewise, TWRP also allows you to wipe various device partitions that come in handy when you are flashing a custom ROM or GSI ROM. Apart from that, you could also mount external storage like USB or OTG Pendrive via its Mount feature. Then there is some advanced functionality like its Terminal, Recovery Ramdisk, among others. We won’t go into details about all these since most of the readers might already be aware of it. What they might not be aware of is the fact that how could they install TWRP Recovery onto the OnePlus Nord device. This is where this guide will come in handy. The below instructions will be broken down into separate sections for the ease of understanding. So without further ado, let us begin.
How to Install TWRP Recovery on OnePlus Nord
Before proceeding with the flashing steps, there are a few prerequisites that you need to qualify. So make sure to go through them and only then start with the steps to install TWRP Recovery on OnePlus Nord.
STEP 1: Prerequisites
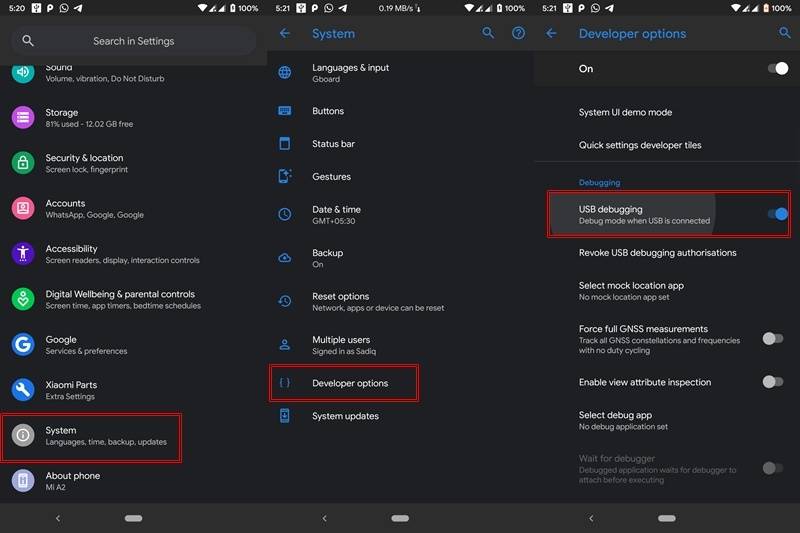
First off, download and install the Android SDK Platform Tools on your PC. This will supply us with the necessary ADB and Fastboot binaries. Furthermore, it will help your PC in identifying your device in both the ADB and Fastboot modes.Next up, enable USB Debugging on your Nord device. For that, head over to Settings > About Phone > Tap on Build Number 7 times > Go back to Settings > System > Advanced > Developer Options > Enable USB Debugging. This is needed so that your device gets recognized in the ADB mode, which in turn will be needed to boot your device to Fastboot or Bootloader Mode.
TWRP GUIDES
How to Install OTA Updates in Rooted Android DeviceHow to Permanently Install TWRP without TWRP ZIP File (only using TWRP.img file)Root Android Devices Without TWRP RecoveryHow to Fix TWRP Error 7 (While Flashing Custom ROM via TWRP)
STEP 2: Download TWRP for OnePlus Nord
You could now download and TWRP Recovery for your OnePlus Nord. The credit for which goes to XDA Recognized Developer mauronofrio.
TWRP for OnePlus Nord [RECOVERY][3.4.0-0][avicii]: Download Link.
Here are all the working features and some of the bugs with this TWRP at the time of writing:
STEP 3: Unlock Bootloader
It goes without saying that for carrying out any of the device modifications, you will have to unlock your device bootloader. Things are all the same for your Nord device as well. So please refer to our guide on How to Unlock the Bootloader on OnePlus Nord. – TWRP boots normally – Decryption works – Rom flashing should work Not Working – Format data is broken – Still in Testing Phase, so you might face some stability issues. Anyways, it still quite a commendable job on the part of the developer to release the TWRP at such an early stage.
STEP 4: Rename TWRP and Move it to ADB Folder
Now you have to rename the recovery file to simply twrp. Since it is an image file, the complete file name will hence be twrp.img. Furthermore, you will have to move this TWRP inside the folder where the ADB and Fastboot files are installed, i.e inside the platform-tools folder.
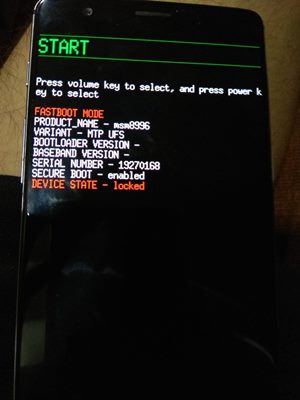
STEP 5: Boot OnePlus Nord to Fastboot Mode
Now that you have got the necessary files, its time to make full use of the same. For that, your device needs to be booted to the fastboot or bootloader mode. Here is how to do so: MAGISK GUIDES
[GUIDE] Flash ROMs/Magisk/TWRP/Kernels on A/B Partition DevicesEverything About Magisk- Manager, Modules and MoreBest Magisk Modules of 2020 [PART-1][3 METHODS] Unroot any Android Device-Uninstall Magisk
STEP 6: Install TWRP on OnePlus Nord
To begin with, this is an image file of the recovery (twrp.img). Hence, as of now, we would only be able to boot the OnePlus Nord to TWRP. For the permanent installation, we require the TWRP Installer ZIP file which isn’t available as of now. So what it means is that the next time you boot your device to recovery, it will be booted to stock recovery. To deal with this, there are a few workarounds. The first one is to simply boot your device to TWRP via the fastboot commands given below. However for that. you need to have a PC every time in front of you. The second option is making use of a third-party app like Flashify. Through this app, you could easily flash all the ZIP, Recovery, and Boot image file. For most of the users, this is what they might be using TWRP for in the first place. So until the TWRP Installer makes it way, my personal opinion is to go for a third-party app like Flashify, but it ultimately boils down to our reader’s personal preferences. Anyways, here are the required commands to flash the TWRP Recovery onto your OnePlus Nord device. Make sure that your device is connected to PC in fastboot mode. Also, the Command Prompt window needs to be opened inside the platform-tools folder only. Not to mention the fact that the twrp.img file should be present there as well. If all these requirements are done, then head over to the Command Prompt window and type in the following command to boot your device to TWRP Recovery: That is it. Your device will now boot to the TWRP recovery and you could now carry out the desired flashing of files and mods. Or you could now root your OnePlus Nord using TWRP Recovery as well. With that said, we conclude the guide on how to install TWRP Recovery on OnePlus Nord. As mentioned before, as of now you will only be able to get the temporary installation of the recovery. As and when there is any further development in this regard, we will update this guide accordingly. Rounding off, if you have any queries, do let us know in the comments section below. We will get back to you with a solution. Android Tips and Tricks
How to Disable Screenshot Captured Notification and Sound without RootHow to Watch Netflix in HD on Rooted Devices ( Get Widevine L1 Support )Enable USB Debugging on a Broken Android Device’s Screen? Here’s a WorkaroundHow to Go Back to Stock ROM from GSI ROM (All Android Devices)
About Chief Editor